|
DAN
CHERRY'S PROCEDURE
For the advanced
modeler, detail is all important in achieving a high level of
authenticity. The tank room aft of #3 funnel has eight large
square openings you can see into, unless you choose to have
the windows covers in a closed position. In most Titanic pictures,
the covers are propped open to let light and air into the engine
room below. The openings did not have glass in them and relied
on the covers to keep debris and rain from falling down to the
machinery. There are four portholes in each cover that had glass
in them.
With this in mind,
what sort of detail was in this shaft leading down to the bottom?
No photos exist of this area, but ship plans provide some insight.
Refer to the plans on page 42 and 43 of Anatomy of the Titanic.
|
Step 1 (making
the shaft opening on the Boat deck).
First, cut
the plastic out of the square on the boat deck to create
an opening for this shaft.
|
|
Step 2 (adding
the two interior doors).
There are two
doors aft of center on the p & s walls. Fabricate
these walls out of thin sheet plastic and glue a door
in place on each wall, also with sheet plastic.
|
|
Step 3 (providing
catwalks and ladder access to lower levels).
Common sense
would dictate that there must have been a catwalk system
or ladders to below.
Make these
from unused GMM railings perhaps some of the kit's stairs,
either unpainted or painted steel (Testors 1180).
I suggest that
you only detail the shaft down to A-deck. Paint the A
deck section underneath dark gray to simulate the shadowy
depths. An extremely dedicated modeler may wish to re-create
this shaft down to the engine room and build the engine
heads and pipe systems, ribbing, etc.
This detail
would be very difficult to see without the aid of a pen
light or direct sunlight and would be there more for the
modeler's satisfaction.
|
|
Step 4 (painting
the interior floors of the tank room).
The outboard
windows can provide a glimpse into the p & s tank
rooms.
The cutaway
painting of Ken Marschall's suggests that crew area flooring
was sort of a rubber tile, reddish color. Paint the floors
'bubble gum red'.
|
|
Step 5 (making
the tanks for the interior tank rooms).
For the tanks
shown on page 42-43 of Anatomy of the Titanic, I used
kit parts G30, painted white. Glue them in the proper
place, seen as the 'hot salt tank' in the port room, and
the unmarked tank in the SW corner of the starboard room.
For the remaining
tanks I glued scrap plastic to the floor. Not a whole
lot will be seen through the windows, but it does add
depth to the rooms.
A note of caution,
most of the plans in Anatomy are of Olympic some years
after the Titanic disaster, and are not to be relied upon
as patterns for the Titanic model. These plans are one
of few which depict the configuration of crew areas and
should be used with discretion.
|
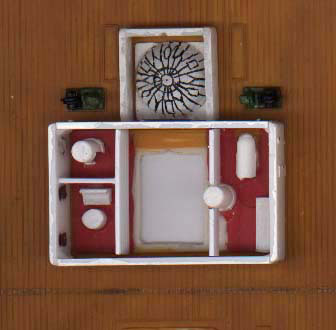
Photo
of Dan's finished Tank Room.
|
|